Morning!
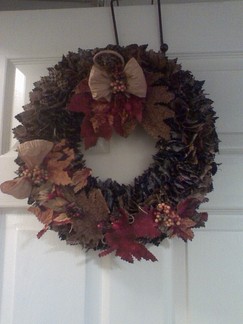
I'm up at 6 AMish. Coffee in hand, rubbing eyes and eager to share some craft resources! I didn't get to write up my crochet pattern I wanted to share; I apologize. But I did include instructions on the Rag Wreath; a quick craft to complete. I do have some cool sites for you to explore and the free crochet patterns I found among others for diversity. Enjoy! Crochet: Knotted Headband Crochet Pattern by Rescue Paw Designs Kiss Me at Midnight Cowl by The Stitchin Mommy Gold Leaf Infinity Scarf by fiber flux Quilting: Very pretty Log Cabin Table Topper Free Instruction from Accuquilt Blog Fons & Porters Love of Quilting Connecting Threads Freebies FaveQuilt Dairy of a Quilter General Crafts: AllFreeHolidayCrafts for last minute and easy gift ideas. CraftStylish A friend of mine on Facebook mentioned making Roman Blinds out of old Mini Blinds. Now how cool is that! So I did a search and found these two sites with instructions. Simply Mrs. Edwards - DIY: Roman Shades From Mini-Blinds Little Green Notebook - DIY: Roman Shades from Mini-Blinds (Revised!) I used to make Rag Wreaths to give as gifts and to sell. The wreath pictured is made from scrap fabric left over from an antique quilt I made. The fall leaves are fabric appliqués, the bows are raffia and I included little fall berry sprigs. They are very easy to make. Materials: Pencil - sharpened or small Phillip screwdriver 1 yard fabric - solid color or pattern of your choice (2 or more 1/2 yards of fabric in different colors will work, too) 12" stryofoam round wreath Embellishments (your choice) Wire and hot glue gun With fabric(s) cut 2x2" squares. Start out by cutting 50 or so squares, then cut more as needed. Place the pencil in the center of the right side of fabric square, hold the fabric on pencil, place a little super glue on the tip and punch into styrofoam wreath (not to hard and don't punch through the other side). I started in the top center of wreath and continued around the center. Then I filled in on both sides. Be sure to go a little past the edge; lay the wreath flat on a table and make sure you can't see stryofoam in the center ring and outer edge, if so fill in with more squares. With the wire - make a small secured loop and superglue on top back side for hanging. Let dry. Embellish your wreath and hang! You can also use the wreath as a center piece with candles in the middle for your table decor. Tip: As time goes by and the wreath gets dusty; just take a can of air and blow the dust off. Hope you have a great weekend and keep crafting! 

Comments are closed.
|
Bicky
Hi! I'm Brenda aka Bicky. Archives
January 2016
CategoriesHappily Hooked Crochet Magazine
It's Digital! 
Visit me on Ravelry
Blogs I Follow Moogly Beatrice Ryan Designs Rescued Paw Designs Crochet Pattern Bonanza CrochetN'Crafts Make My Day Creative Petals to Picots Love Crochet Hopeful Honey Marcus Fabrics Stitch & Unwind Madigan Made Heart Strings Make it Coats Sewing Secrets Seams and Scissors Happily Hooked Blog sew momma sew Sizzix Blog Craft Passion The stitchin' Mommy fiber flux |
 RSS Feed
